#linux
Configuring Fans with Linux Command Line
Published Sep 27, 2022 by Alik Ulmasov
I recently tried to make my fans quieter in an old computer which I’ve repurposed to be a home server (running Ubuntu Server). This computer sits in my home office, and I’d like it to be as silent as possible.
Being relatively new to this, I found the expirience of configuring fan speeds in Linux surprisingly daunting and am writing about it in the spirit of blogging about my problems in case it helps someone else.
I am not an expert on fan hardware, nor am I an expert on Linux. Configuring fans incorrectly may cause damage to hardware. Proceed at your own risk.
Step 1: Install the required software
We will need 3 programs: lm-sensors to view sensors, fancontrol to control fan speeds, and s-tui to stress test the system. So go ahead and install them:
sudo apt install lm-sensors fancontrol s-tui
Step 2: Configure sensors
Run sudo sensors-detect. Hit Enter to all the yes/no questions to accept the defaults. If you instead answer “yes” to everything, it may detect more sensors, but apparently that has the potential of crashing your system. It was fine for me, but be warned.
Once that’s been run, it will give a list of modules that need to be loaded, like this:
To load everything that is needed, add this to /etc/modules:
#----cut here----
# Chip drivers
coretemp
nct6775
#----cut here----
If you have some drivers built into your kernel, the list above will
contain too many modules. Skip the appropriate ones!

Do you want to add these lines automatically to /etc/modules? (yes/NO)
Type “yes” and it will insert those modules into /etc/modules. Finally, run this to insert the new modules into the kernel:
sudo systemctl restart kmod
Now, if you run the command sensors, you should see a bunch of sensors, including the fan RPMs:
fan1:             0 RPM  (min =    0 RPM)
fan2:          1018 RPM  (min =    0 RPM)
You should also see the CPU temperatures, like this:
coretemp-isa-0000
Adapter: ISA adapter
Package id 0:  +43.0°C  (high = +80.0°C, crit = +98.0°C)
Core 0:        +43.0°C  (high = +80.0°C, crit = +98.0°C)
Do you see those things? Great! Move on to step 3. Otherwise…
Potential Issue: OS-Firmware Resource Sharing
I have an ASUS motherboard, and unfortunately it seems like linux has an issue with those (and possibly many other motherboards).
Based on this thread, it sounds like linux devs are hesitant to allow the OS to read the sensor data because it can sometimes be bad for the firmware and the OS to both be interacting with the sensors at the same time.
The solution is to set your system to boot with “lax resource sharing”. As the thread points out, this could be dangerous in some situations, but it’s working fine for me, and lots of people on the internet seem to be doing this.
If you look at /etc/default/grub, there are two lines that look like this:
GRUB_CMDLINE_LINUX_DEFAULT=""
GRUB_CMDLINE_LINUX=""
As sudo, you’ll need to change the second line to lax resource sharing:
GRUB_CMDLINE_LINUX="acpi_enforce_resources=lax"
After that, update GRUB and reboot:
sudo update-grub
sudo reboot
Finally, load the driver via modprobe, insert the name of your driver instead:
modprobe nct6775
Now when you call sensors, you should see all the sensors for the fans and CPU temps.
Step 3: pwmconfig
Now that you have sensors, it’s time to set up fancontrol, which is the software that will run in the background and control the fans. Fancontrol works by sending PWM pulses (electricity, basically) to the PWM controllers on your motherboard, which will cause your 4-pin fans to spin at different speeds.
Before we can run fancontrol, we must set it up via pwmconfig. Run sudo pwmconfig.
It will list the PWM controls it sees, and ask you whether to setup the output for manual control, hit y to these in order to configure those fans.
Next this script will stop each fan for 5 seconds to figure out which PWM control controls which fan. It will warn you first (hit Enter). You should hear the fans turn off, and then it will identify which fan is controlled by which pwm controller, for example:
  hwmon2/fan1_input ... speed was 1689 now 0
    It appears that fan hwmon2/fan1_input
    is controlled by pwm hwmon2/pwm1
Next, it will ask if you would like a detailed correlation. If you hit y, it will show you how fast each fan spins at different levels of PWM, which may be useful depending on your needs. You can hit n to these if you don’t want to wait.
It will then ask you if you want to set up a configuration file, hit y. That file will be written to /etc/fancontrol.
Finally, it will get to a prompt, like this one, with multiple choices. Note: This is not obvious – you can’t just hit “Save and Quit” here, instead you must select each PWM (in this case 1 and 2) first and configure those, otherwise it will just write a file with no values.
Select fan output to configure, or other action:
1) hwmon2/pwm2	       3) Change INTERVAL     5) Save and quit
2) hwmon2/pwm1	       4) Just quit	      6) Show configuration
When you pick a pwm to configure, it will give you a list of temperature sensors in your computer, and ask which sensor will be used to control the pwm.
I’m not sure what the right way to do this is, but I picked temperature sensors on the coretemp device (it will give a list of hwmon devices at the top), and then I picked middle values from those sensors. I picked different coretemp sensors for different fans.
Then it will ask you which temperatures the fans should start spinning and max out at, and finally what PWM value to use for the max temperature. You can accept the defaults here, since you can always reconfigure these later.
Configure the rest of the PWM devices, and then press 5 for “Save and quit” when your done. It should have written an /etc/fancontrol file.
Step 4: fancontrol
Before turning on fancontrol, take a look at the /etc/fancontrol file. At the bottom of it should be a section along the lines of this:
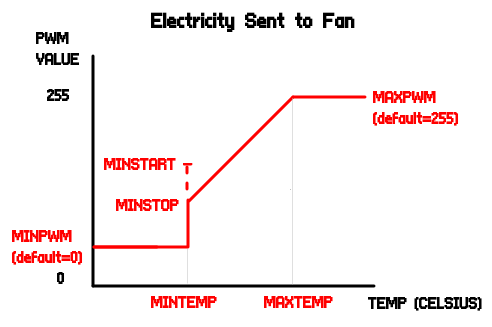
MINTEMP=hwmon2/pwm2=50 hwmon2/pwm1=50
MAXTEMP=hwmon2/pwm2=60 hwmon2/pwm1=60
MINSTART=hwmon2/pwm2=150 hwmon2/pwm1=150
MINSTOP=hwmon2/pwm2=0 hwmon2/pwm1=100
The man page for fancontrol, which has definitions of all the variables, admits that the format of the config file is “a bit strange”.
These values can be pretty confusing, but it’s done this way because fancontrol doesn’t actually tell the fan how fast to spin (in RPM), it only controls PWM. So basically this controls how much electricity will be sent through a PWM controller when the temperature sensor is at a certain value.
-
MINTEMPandMAXTEMPare the temperatures (in Celsius) at which the fan will start up and reach maximum speed, respectively. -
MINPWMandMAXPWM– (likely not specified) will be set at 0 and 255 by default, meaning that fancontrol won’t be sending any PWMs to the fan by default. The fan will be off if the temperature is less than MINTEMP, and it will be send maximum PWM (255) to the fan if the temperature is over MAXTEMP. If you want your fan to always spin, set the MINPWM to some positive value. -
MINSTART– the PWM value at which the fan starts to spin. This number depends on your fan, as fans will not start spinning until they get some specific PWM amount. It could be worth setting this number a bit higher than the actual minimum for the fan, because the fan will age. If a fan doesn’t start spinning until it gets 50 PWM right now, it might get worse as it ages and start spinning at 60PWM. -
MINSTOPis similar to MINSTART, except that this is the PWM value at which the fan stops spinning. The reason the two values are different is because it takes more PWM to start the fan than it does to keep it running. For example 60 PWM may start the fan, but it will stay spinning unless the PWM is below 50.
I adapted the graph from here which helps explain what each of the variables do:
Once you have set the variables as you want, run this to actual start the program:
sudo service fancontrol restart
You can use sensors | grep fan to see the speed at which the fans are spinning, and systemctl status fancontrol to see the status of the fancontrol software.
Step 4: Stress Testing
Now that fancontrol is running, it’s possible that some of your fans are spinning low or are off. To stress test what they do under high load, we can run the program s-tui.
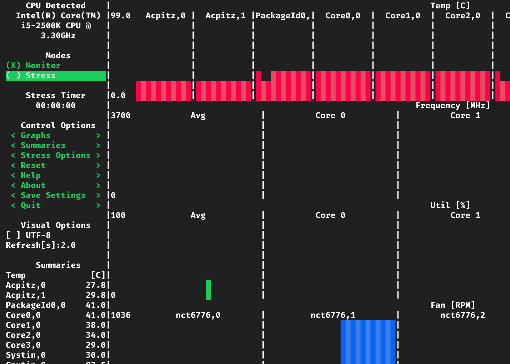
On the left bar, you’ll see a “Summaries” section that will show the values of your sensors (you can configure what is shown here), and you will see them in graph format on the right.
Before beginning the stress test, it is probably a good idea to make sure everything is backed up and nothing computationally intensive is running. When you hit “Stress”, the CPU usage will go to 100% and your CPU temperature should begin to rise. This is a good test of whether the fans will kick at their expected temperatures. Finally, switch it back to “Monitor” to end the stress test.
© 2024 Alik Ulmasov