#javascript
RSVP Form with Google Apps Script
Published May 21, 2023 by Alik Ulmasov
This post is a step-by-step guide to building this from scratch. If you want to just get started quickly, please see the Github Page.
Have you ever wanted an RSVP form for an event, but didn’t want to use a third-party alternative which tracks your data, isn’t customizable and costs money?
This is a fully DIY solution, and there are some advantages to doing it this way:
- Convenience – Your guest’s RSVP responses automatically get saved to a Google Sheet and emailed to you.
- Control – Fully integrates into your website and styled by you. You control every detail.
- Simplicity – No “backend” to maintain. Just one Javascript file, without dependencies, that can be hosted anywhere (e.g. Github Pages)
- Price – Free to use, don’t need to pay for hosting.
- Privacy – you’re collecting the data yourself.
Overview
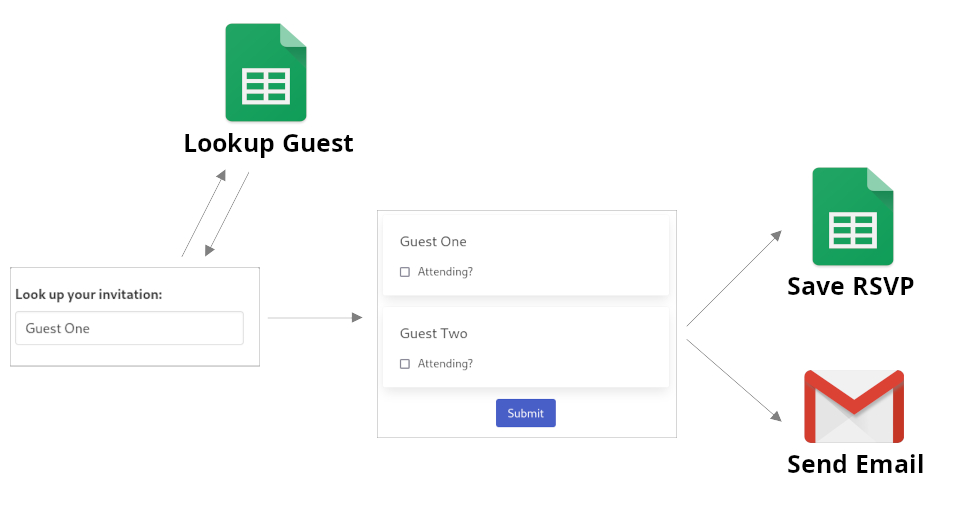
Here is an overview of how the process works:
- Your guests enter their name (or the name of one of the guests in their party)
- It checks whether they are on the guest list
- It makes the RSVP form for all the guests in that guest’s party
- It saves their submission back to the Google Sheet
- It sends you an email with their results
- It marks them as having RSVP’d, so they can’t RSVP again
As mentioned above, the guide below is a step-by-step walkthrough of how to make this from scratch. If you just want to start using it, go to the Github Repo and follow the instructions. There is a basic version (see simple_form.html), and a styled version (styled_form.html) which is styled with Bulma CSS.
Step 1: Guest Lookup Function
Create the Google Sheet
For mine, I created a separate Gmail account and used that account to make these Google sheets and code. You may also want to do that before proceeding.
In Google Sheets, create a spreadsheet. It should have two tabs, one named “invites”, which should have 3 columns: (name, inviteID, hasRsvpd). The other one should be named “responses” and should have 3 or more columns (inviteID, name, attending), and whatever other fields you want to keep track of:
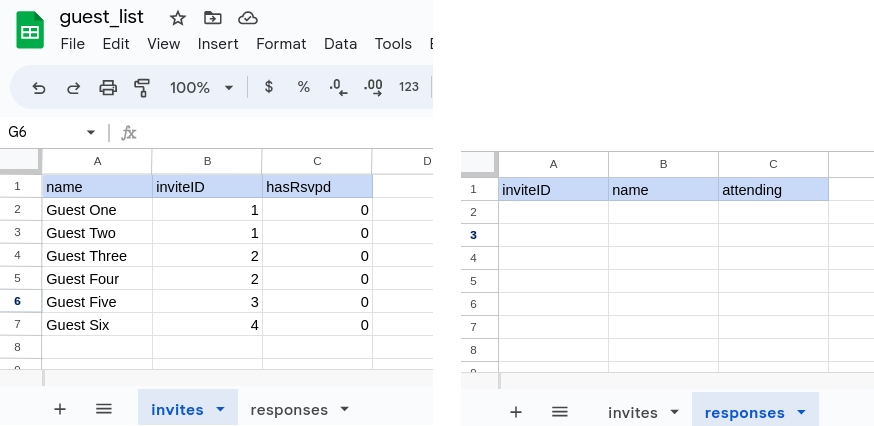
Place your guest list in the “invites” tab. The “responses” tab should be empty to start. This is what the fields mean:
- inviteID – is a way to group parties together, anyone one the same “inviteID” will use the same RSVP form.
- hasRsvpd – will get set to “1” once that party has RSVP’d. To start, it should be all zeros.
- attending – on the responses tab will be 1 or 0 depending on whether each guest is attending. You can add any other fields you want to keep track of to this tab.
Create the Apps Script
While we’re in the Google Sheet, let’s create the Apps Script that will power the server side of things. In Google sheets, go to Extensions » Apps Script. Replace the default “myFunction” with this:
function doGet(e) {
    var inputName = e.parameter.name;
    var sheet = SpreadsheetApp.getActiveSheet();
    var lastRow = sheet.getLastRow();
    var nameFound = false;
    var id;

    inputName = inputName.toLowerCase();
    isRSVPd = "0"

    // loop through list of all names to check if it matches input name
    for (var i = 2; i <= lastRow; i++) {
      var thisName = sheet.getRange(i, 1).getValue().toString().toLowerCase();
      if (thisName === inputName) {
        nameFound = true;
        id = sheet.getRange(i, 2).getValue();
        isRSVPd = sheet.getRange(i, 3).getValue();
        break;
      }
    }

    // already RSVPd?
    if (isRSVPd=="1"){
      return ContentService.createTextOutput("Already RSVPd");
    }

    // loop through the names again to find other names with that ID
    // turn them into a comma separated list
    var outNames = ""
    for (var i = 2; i <= lastRow; i++) {
      var thisID = sheet.getRange(i, 2).getValue()
      if (thisID == id) {
        outNames = outNames + "," + sheet.getRange(i, 1).getValue().toString()
      }
    }

    // output the results back to the form. will be comma delimited, like: id, name1, name2
    var out;
    if (nameFound) {
      out = id.toString() + outNames
    } else {
      out = 'Name not found'
    }

    return ContentService.createTextOutput(out);
  }
Now, when the Apps Script receives a GET request, it will run this code. The input is a guest’s name, and the output is a comma delimited string containing the inviteID for that guest’s party, and the name of each guest in that party.
If it can’t find the guest’s name in your list, then the output will be “Name not found”, and if the guest has already RSVP’d, the output will be “Already RSVPd”.
Next, you’ll need to deploy the web app. Hit the big “Deploy” button at the top, then “New deployment”. There, Select Type » Web app. Enter a description. For “Execute as”, leave the default (your gmail account), and importantly, switch “Who has access” to “Anyone”.
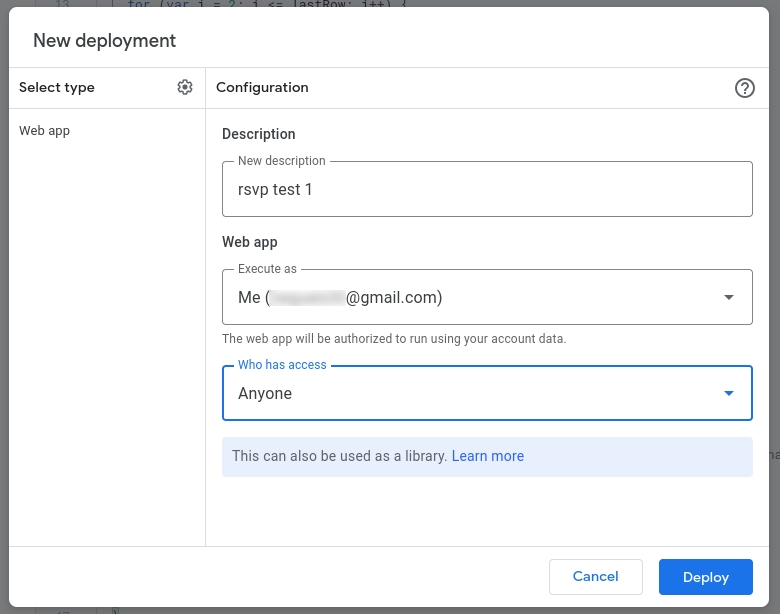
Since you’re allowing anyone on the internet to run this script, it’s going to give you a bunch of warnings now. First, press “Authorize access”. That will create a pop up where you will need to sign into your account. Then, there will be a screen telling you that “Google hasn’t verified this app”. You will need to press Advanced » Go to your_script_name (unsafe). Finally, you will need to press “Allow”.
Your script is now live! Google will give you your deployment ID and a URL with which your app can be called.
Step 2: Make the HTML Form
Create the HTML Form
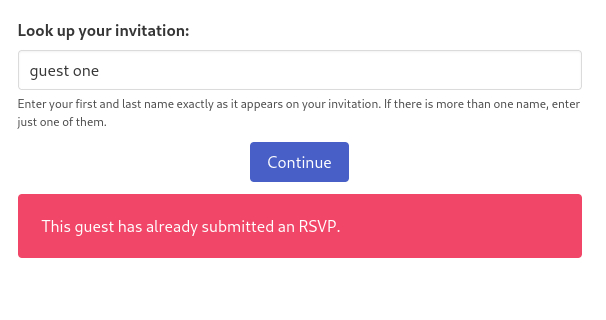
Now, you’ll need an HTML form with a guest lookup field and a submit button. You should also have a spot where errors will show up.
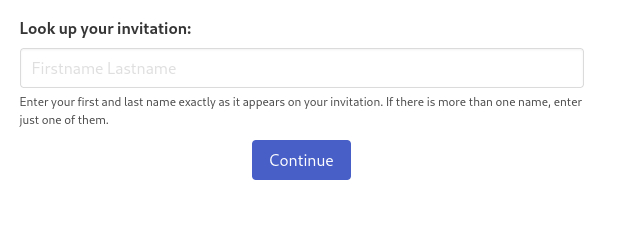
The picture above is styled, but this is the HTML in its simplest form:
<form id="form">
	<label>Look up your invitation:</label>
	<div>
		<input name="name" type="text" placeholder="Firstname Lastname">
	</div>
	<p>Enter your first and last name exactly as it appears on your invitation. If there is more than one name, enter just one of them.</p>
	<button type="submit">Continue</button>
	<div id="output"></div>
</form>
<script src="rsvp.js"></script>
Create the Client-Side Javascript
Now, you’ll need the client-side Javascript function that will run when the user hits “Continue”. That function will send the guest’s name to the Apps Script, and will process the output. In its simplest form, that javascript function should look like this:
document.getElementById('form').addEventListener('submit', function(event) {
    event.preventDefault();
    var name = this.elements.name.value;
    var xhr = new XMLHttpRequest();
    xhr.open('GET', 'https://script.google.com/macros/s/YOUR_GOOGLE_APPS_SCRIPT_ID/exec?name=' + name, true);
    xhr.onreadystatechange = function() {
      if (xhr.readyState === XMLHttpRequest.DONE && xhr.status === 200) {
        var idAndNames = xhr.responseText;
        if (idAndNames === "Name not found") {
          document.getElementById('output').innerHTML = `<div>Couldn't find guest name.</div>`;
        } else if (idAndNames === "Already RSVPd"){
          document.getElementById('output').innerHTML = `<div>This guest has already submitted an RSVP.</div>`;
        } else {
            // replace this:
            document.getElementById('output').innerHTML = "<div>Name found!</div>";
            // with this, once you've created the function (see below):
            //create_rsvpPage1(idAndNames)
        }
      }
    };
    xhr.send();
  });
At this point, we have a working setup. If you open your form locally, type in a name and press “Continue”, you should get a result.
Step 3: Collect Responses
Next, we’ll need the actual RSVP form to collect guests’ information. The following code just collects whether each guest is coming to the event, but the code is intentionally flexible. It can handle an arbitrary number of guests on each “invite ID”:
function create_rsvpPage1(idAndNames){
  const data = [];
  const inputArray = idAndNames.split(',');
  const inviteID = inputArray.shift() || "NA";

  // Iterate through the remaining names and create an object for each person
  inputArray.forEach((name, index) => {
    if (name) {
      data.push({
        inviteID: inviteID,
        name: name,
        attending: 0,
        id: `person${index}` // checkbox id, so submit button can find it
      });
    }
  });

  // Write HTML and checkboxes for each person
  document.getElementById('entireForm').innerHTML = `
    <div>
      We found your RSVP!<br/><br/>
	${data.map(
          person => `${person.name}: <input type="checkbox" id="${person.id}" /> Attending?<br/><br/>`
        ).join('')}
      <button id="submit">Submit</button>
    </div>
  `;

  // Submit button code
  document.getElementById('submit').addEventListener('click', () => {
    // write each person's attending value to "data"
    data.forEach(person => {
      person.attending = document.getElementById(person.id).checked ? 1 : 0;
    });

    submitForm(data);

    // Disable the submit button so people can't click on it multiple times
    document.getElementById('submit').disabled = true;
  });
}
This code makes an array called “data”, that looks like this:
[ [inviteID: "5", name: "Guest One", attending: 0],
[inviteID: "5", name: "Guest Two", attending: 0] ]
Furthermore, it will generate an HTML form like this, with a “Submit” button which will be used to populate the “attending” value of “data” for each guest:
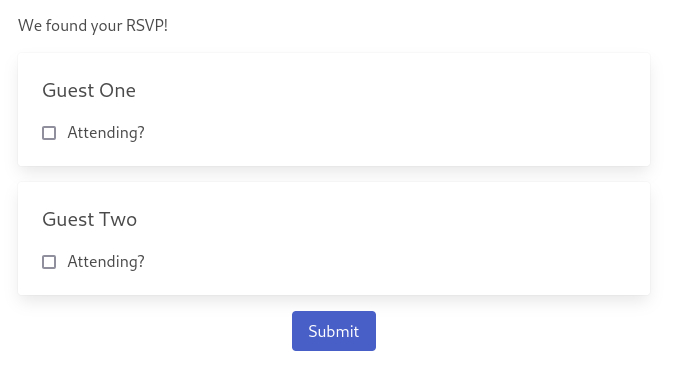
This part is meant to be flexible, and you can re-write this to collect additional information and stick it into the contents of the data array for each guest.
Step 4: Submit Form, Write Results and Email
Now we’ll need a function to send the contents of data back to our Google script:
function submitForm(data) {
  const url = 'https://script.google.com/macros/s/YOUR_GOOGLE_APPS_SCRIPT_ID/exec';
  const xhr = new XMLHttpRequest();
  xhr.open('POST', url);
  xhr.setRequestHeader('Content-Type', 'application/x-www-form-urlencoded');
  xhr.onload = function() {
    if (xhr.status === 200 && xhr.responseText === 'Success') {
		document.getElementById('entireForm').innerHTML = `<div>Success!</div>`;
    } else {
      return; // error
    }
  };
  xhr.onerror = function() {
    return; // Request failed due to a network error or other issue
  };
  xhr.send(serializeData(data));
}

function serializeData(data) {
  // helper function to avoid loading a library
  return data.map(obj => {
    const params = new URLSearchParams(obj);
    return params.toString();
  });
}
Then we’ll need the server-side code to receive the data and process it. Go back to your Google Apps Script, and put this right after the doGet() function we’ve already written.
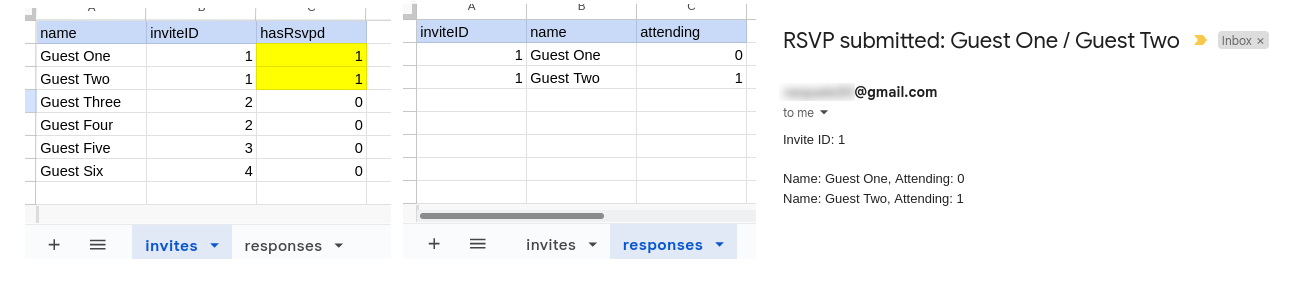
This is doPost(), which will run when the script recieves your POST request. It will do three things:
- Write the guest’s RSVP info to a new row of your spreadsheet.
- Send you an email.
- Set that guest’s RSVP status as “1”, meaning the guest has RSVP’d and can’t RSVP again.
function doPost(e) {
// read input
var data = JSON.parse(e.postData.contents);
var inviteID = data[0].inviteID;

// 1. append to responses spreadsheet
var sheet_responses = SpreadsheetApp.getActiveSpreadsheet().getSheetByName('responses');
for(var i = 0; i < data.length; i++) {
  var row = [
      data[i].inviteID,
      data[i].name,
      data[i].attending
  ];
  sheet_responses.appendRow(row);
}

// 2. mail success email
var allNamesStr = data.map(function(obj) {return obj.name;}).join(' / ');
var allDataStr = "Invite ID: " + inviteID + "<br/><br/>" + data.map(function(obj) {
      return "Name: " + obj.name + ", Attending: " + obj.attending;
  }).join('<br/>');

  MailApp.sendEmail({
  to: 'YOUR_EMAIL@gmail.com',
  subject: "RSVP submitted: " + allNamesStr,
  htmlBody: allDataStr
});

// 3. Set guest's RSVP status to "1"
var sheet_invites = SpreadsheetApp.getActiveSpreadsheet().getSheetByName('invites');
for (var i = 2; i <= sheet_invites.getLastRow(); i++) {
  var thisID = sheet_invites.getRange(i, 2).getValue().toString();
  if (thisID === inviteID) {
      sheet_invites.getRange(i, 3).setValue("1");
  }
}

return ContentService.createTextOutput('Success');
}
That’s it! Now, when a guest fills out the RSVP for their party, it will drop their data into the Google Sheet, and you should recieve an email with the result:
A Note About Button Styling
The communication with the Google Apps Script may take a few seconds. From experience, guests using the RSVP form may be confused by why the page doesn’t respond immediately, and keep clicking the buttons.
That’s why it’s a good idea to disable the button once it’s clicked, and add a spinner to let the user know that someting is happening:

© 2024 Alik Ulmasov